
Overview
The measurement tools are located in the main markup toolbar available when you open up one of your plans. These measurement tools allow you to calibrate distance, indicate length, and record surface area directly onto your plans.
If your plans have a scale printed on them, our software will automatically read that scale and calibrate the drawings for you. (Please note that this only works if the scale is text/vector-based).
To confirm if the OCR software was able to recognize and calibrate the plan sheet scale, click the Measurement icon and you will see options for the Distance and Area tools.
If these are not displayed, then the plan sheet scale will need to be calibrated.
Note: At this time, we do not have the ability to measure in millimeters using the Metric system. If you'd like to see this feature in Fieldwire, please contact us at support@fieldwire.com as we take each "vote" from our users into consideration for our product roadmap.
Table of Contents
Calibration Tool
Use this tool to create the first length measurement and determine the standard scale for the distance on your plan. The symbol for this tool is a compass. Until you calibrate your plan, this will be the only tool you see in this menu.
Once you calibrate a measurement for that plan, you can use the other measurement tools, such as the first question mark between lines to measure a linear distance or the second question mark in a pentagon to measure area.
To calibrate distance your plan:
- Click once on the plan and drag the line across it until you’ve reached the desired length.
- Click again to finish the measuring action
-
You’ll see a window appear where you can input the distance in feet/inches or meters.
- Note: When calibrating your plan sheets, improper fractions and decimals are both valid, but mixed numbers are not valid. For example, 12' 4.5" and 12' 9/2" are both accepted, but 12' 4 1/2" will not be accepted.
- Once you have saved that measurement, every distance measurement you add afterwards will be automatically determined based on that initial calibration.
Tip: On the web, holding down the "Shift" key while using the measurement tools will snap the line in precise degrees so you can create measurements at specific angles.
Note: If you change the scale of your plan after making additional measurements, then all of the existing measurements will be adjusted to match the new scale.
Calibrate the scale of multiple plans at once
To do this on web:
- Select the checkbox that appears on the thumbnail for each plan you would like to scale.
- If you would like to select the whole set, just click the checkbox next to the plan folder.
- Click on the "Actions" button
- Select "Set scale"
- Input the scale ratio that you want the plans to have
On web plans, the “Set scale” modal displays the current scale applied to each plan, making it easier to confirm or adjust existing settings before saving.
When editing multiple plans at once, the modal states how scales will be applied across the selected plans.
Note: Make sure to use quotations(") for inches holding shift + apostrophe key:
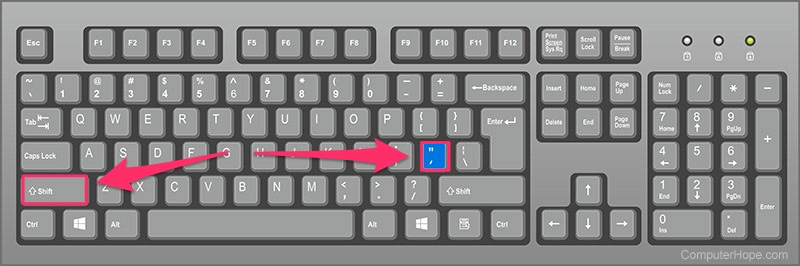
Use an apostrophe (') for feet by typing the apostrophe key:
If you use double apostrophes for inches, the submit button will not turn blue.
Distance Tool
Use this tool to leave distance measurements directly on your plans. The length is automatically calculated based on the initial measurement made with the calibration tool. The symbol for this tool is a ruler.
On mobile, when you create a distance measurement, you'll be able to leverage the magnification tool to ensure these will be accurate:
Area Tool
Use this tool to measure the area within a shape. The symbol for this tool is a filled-in polygon. When you select this tool, first click on your plan and move the line that appears along the edge of the area you wish to measure; each time you click, a new point will be made in the shape.
You must have a minimum of three points in your shape to determine the area measurement, but you can have as many points as necessary to encompass the desired area. Double-click to finish creating the shape. The measurement will automatically appear in the center of the shape.
On mobile, you can also leverage a magnification tool to ensure that the area markup is accurate; when the markup is complete, be sure to double-tap to complete it:
Multi-line Measurement Tool
Use this multi-line measurement tool to measure paths, perimeters, or other continuous multi-point lines. The distance is automatically calculated based on the initial measurement made with the calibration tool. The symbol for this tool is two arrows creating a 90 degree angle. When creating one of these measurements on the web, be sure to double-click the measurement to finish it. You can also click on the last point in the measurement to finish it.
Change units of measurement
You can change the units of measurement used for these tools by going to the 'Settings' page of any project. You will find a “Measurement” section where you can choose between “US/Imperial” (Feet and Inches) or “Metric/SI” (Meters). This will affect all the measurements that you previously made and all future ones you make on your plans.